10/28/2021
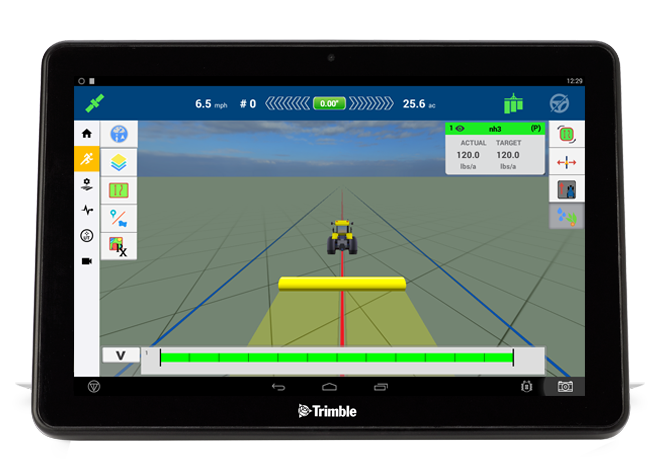
Variable rate prescription maps created in SatAgro are fully compatible with Trimble TMX-2050 terminals. To import a prescription maps into a TMX-2050 terminal you can either download the maps from the SatAgro precision treatment creation module or send them directly to your terminal using Trimble Ag cloud solutions.
Importing prescription maps from USB
To import prescription maps from a USB stick to a TXM-2050 terminal, the USB stick must contain a strictly defined file structure. To receive the data correctly prepared remember to specify the terminal model when creating the prescription map. When the map is ready just click on “Download > terminal format” in the SatAgro precision treatment creation module.
To avoid difficulties, it is best to use an empty USB 2.0 stick on which you can copy the folder that is created after unzipping the file downloaded from the SatAgro platform. After copying this folder from your computer to the USB stick continue with the following instructions:
- Insert the USB into the USB port of the TMX-2050 terminal.
- Touch the bottom right corner of the screen.
- A list of different notifications will appear.
- Click on the USB icon

- The terminal will display the USB options menu, among which you will have the File transfer option.
- Press on the icon
 to transfer the files from the USB memory stick to the terminal.
After this step the prescription maps should be already imported in your Trimble and everything should now be ready for you to work with the maps on your terminal.
Use of prescription maps in a TXM-2050 terminal
Whether you have loaded the maps from a USB stick or the maps have been transferred via the SatAgro integration with Trimble to use the prescription map on a TMX-2050 terminal, it is necessary:
- adjust and confiture the parameters of the equipment (spreader, sprayer, etc.) controlled by the terminal,
- select the field in which you will carry out the treatment,
- assign the prescription map to the field.
Prescription map configuration
Before using a prescription map to treat your field, it is necessary to adjust its parameters. To do so, follow the steps below:
- In the Run menu click on the prescription map icon
 .
. - From the list of active channels that will appear, select the one you want to use for the treatment.
- Then you should be able to select the file to be used by clicking on the option Prescription File Name.
- Select the prescription map from the available files.
- Confirm the section by pressing Next.
- Select the Column name with the dose values. For SatAgro maps select the DOSE column.
- Then select the column with the units in which the dose values are given (Column Units).
- The last necessary step is to set the behaviour of the equipment when it leaves the zones defined in the prescription map (When outside Prescription). You can select between:
- Close: the equipment will stop spreading the used product,
- Last Rate: last used value of the prescription map,
- Default Rate: default rate set manually when performing the setup.
Once all parameters have been configured, press Finish and confirm to save the prescription map data to the terminal.
Loading the map to be used on a treatment
Once you are in the field to perform the precision treatment indicated on the configured map, you only need to perform the following actions to get started:
- In the Run menu it is necessary to click on the button
 to switch to variable dose control mode.
 - Then in the dose control mode, click on the icon for the dose to be set by the prescription map configured.
- To return to manual dose mode, press the prescription map icon once more.
 Platforma